loren
New Member

Posts: 68
|
Post by loren on Mar 1, 2019 19:34:04 GMT -5
One of the first things I did with my laser was break the 3d printed mounting bracket, in the middle of a time critical project of course. So I fabricated a new one in 3/4 UHMW plastic to keep things moving. As it turns out, this mount design has also proved useful for doing things like mounting a gopro that moves with the head, so the video action follows the spindle. Now I'm thinking of making another one to see if I can create a mount for pens and markers, so I thought I'd share the design:    This mounts with four thumbscrews, drilled and threaded into the plastic manually, that fit into the openings of the cooling fins. The holes were drilled at a slight angle, so as the screws tighten it snugs the mount tightly to the spindle holder. The Axium "A" decal is pretty thick and puffy, so the back was recessed a bit to clear the decal. 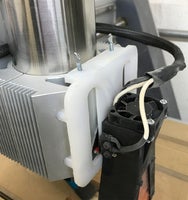 Hope it's useful (and if anyone has built a pen mount already, please share!) Attachments:LaserMount.crv (646 KB)
|
|
andy
New Member
Posts: 3 
|
Post by andy on Mar 2, 2019 8:01:58 GMT -5
I just use a 7/16 collet with a sharpie and turn my spindle off.

|
|
loren
New Member
Posts: 68
|
Post by loren on Mar 2, 2019 9:05:53 GMT -5
So no spring or anything. I was worried about variations in the paper would mean a precise z that worked across a large sheet would be a challenge, but your results look nice.
I know there are commercial mounts that mount in the spindle with a little spring action, but they seem a bit pricey.
|
|
|
|
Post by redwood on Mar 2, 2019 15:53:30 GMT -5
That Sharpie mounting technique seems so simple and the results look great. I need to look into that. What Sharpies are you using? The Sharpies that I have don't have a consistent barrel, but maybe that doesn't matter. They are slightly tapered.
|
|
andy
New Member
Posts: 3
|
Post by andy on Mar 2, 2019 17:41:23 GMT -5
My sharpies are also tapered, i just put in the collet until snug & just tighten the collet nut a little. I also had to ramp my plunge because it left dots at the start point. I only tried this on poster board, it looked like crap on the cheap stuff, it had to have the glossy side.
|
|
|
|
Post by buildswithbrian on Mar 3, 2019 6:33:09 GMT -5
Pretty cool, for the past 3 weeks I have been building a few different accessory mounts to hold pens etc.
and testing them out and what you can actually use them for, it's been a lot of fun.
I hope to be posting a couple videos of the build process and projects real soon.
no laser head though.... just pens & markers.
|
|
|
|
Post by Axiom Tool Group on Mar 4, 2019 9:10:29 GMT -5
Great work all around....we love the mount!
However, if anyone experiences a broken laser component and does not have UHMW, or some other plastic laying around....please feel free to contact JTech Photonics for a replacement part. They have been outstanding in terms of customer service.
Andy, I'm personally going to start an Adult CNC coloring club now thanks to you...lol
|
|
|
|
Post by parkin79 on Mar 4, 2019 10:24:11 GMT -5
My wife is a teacher and wants me to make her posters for her class, that have a hand drawn look to them and not printed. I found this mount on thinkiverse that i am going to try out and see how it works. www.thingiverse.com/thing:2625750 |
|
zaxis4
Junior Member
Posts: 162
|
Post by zaxis4 on Mar 4, 2019 10:35:04 GMT -5
That's the ticket.....good old American ingenuity!!!
|
|
|
|
Post by parkin79 on Mar 6, 2019 14:27:07 GMT -5
I just use a 7/16 collet with a sharpie and turn my spindle off.
Andy how did you set your Z? did you do that in the software? |
|
andy
New Member
Posts: 3
|
Post by andy on Mar 6, 2019 19:00:48 GMT -5
I manually lowered my "Z" axis onto a piece of paper and zeroed the "Z" as soon as i felt the pressure of the sharpie on the paper. Same procedure for manually setting any bit. In the software I told it I was using a 1/8 EM with a cut depth of .03.
|
|
|
|
Post by parkin79 on Mar 6, 2019 21:42:07 GMT -5
Ty Andy I will let you know how it goes.
|
|


