grg
Junior Member
 
Posts: 140
|
Post by grg on Jan 4, 2019 19:28:33 GMT -5
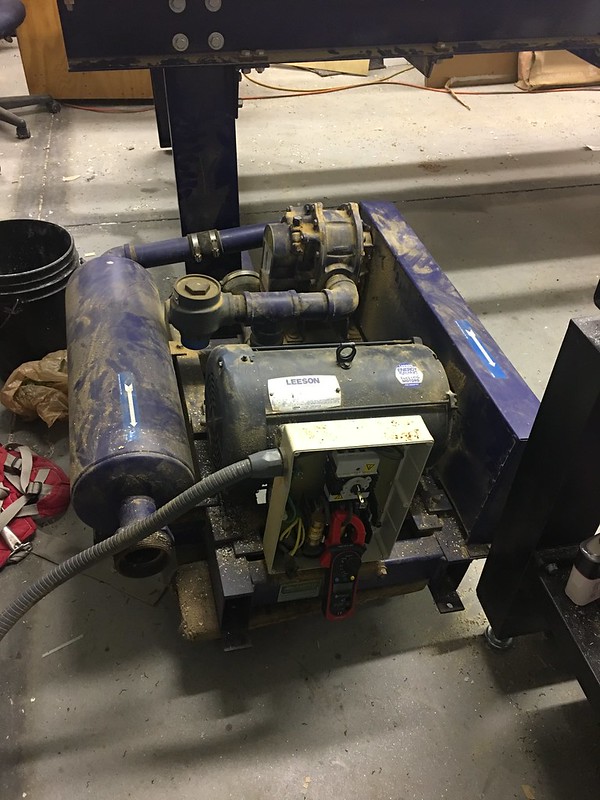
So, I was in the process of designing/building a vacuum source (even purchased one of three motors to design from) when I came across this guy for almost nothing. It makes the meter run pretty well - but boy does it generate some vacuum with flow! It's a roots 7.5hp single phase vacuum motor.  |
|
|
|
Post by vintage on Jan 4, 2019 19:44:23 GMT -5
Brian's way is not the only way. You can do it with a plenum and bleeder board like Gary suggested (with no holes). That is the route I went. Works fantastic. I used a lighthouse vac motor for the suction though. _ Now that looks like exactly what I am thinking! Any more info would be awesome! |
|
zaxis4
Junior Member
 
Posts: 162 
|
Post by zaxis4 on Jan 4, 2019 21:27:38 GMT -5
That is what I am working on now. I need the t-track capability so I am going to cut in some slots for that. I have been hesitant to remove the MDF slats like you did because of that. That may be what I do also. The vac intake is an issue. I looks like you used a gasket of some sort to seal off that connection. Hard to tell from your photos. That really is the most difficult part of the design for me. Where there is a will there is a way. I hope every one following Brian's thread is learning as much about this as I am. Fun..... |
|
|
|
Post by jcwoodworking on Jan 4, 2019 21:27:42 GMT -5
Brian's way is not the only way. You can do it with a plenum and bleeder board like Gary suggested (with no holes). That is the route I went. Works fantastic. I used a lighthouse vac motor for the suction though. _ Now that looks like exactly what I am thinking! Any more info would be awesome! I used a lighthouse LLH6765-OD for the vac. It's a 120v model, I would have liked to use a 220v but didn't have another circuit where the vac is going. I downloaded the flow rate chart for it and used that info to size the channels in my plenum for optimal efficiency. I used regular mdf for the plenum and bleeder board. I did spray three heavy coats of laqcuer on the bottom of the plenum and also edgebanded it and the bleeder. I'm getting about 7.25 in hg with the entire table covered, which seems satisfactory. If I unhook the hose and completely block it off the vac will pull just over 10 in hg. I'm guessing most of the leakage is through the bolt holes holding the plenum to the bed of the machine. As far as the enclosure for the vac, it's pretty simple. I didn't do all the baffles as I'm not too worried about noise. It will be mounted in another room with my air compressor. Next project is to make some zero stops. I have an idea for some spring loaded manually operated pop up pins, just don't know if I can make them to tight enough tolerances to work well. So far I'm extremely pleased. I built two vanity's today and cut all the parts for the boxes with it. |
|
|
|
Post by southernginger on Jan 4, 2019 21:36:08 GMT -5
This is on my list to build... I want to make a full 2x4 or close to it. Thanks for all the great info... I think I need to find a vac first.
|
|
|
|
Post by jcwoodworking on Jan 4, 2019 22:14:09 GMT -5
My plenum is 24.5" x 66". The bleeder is 24.5" x 48.5". About the max I can fly cut.
|
|
|
|
Post by manikbas on Jan 5, 2019 6:11:59 GMT -5
|
|
johnb
Full Member
   New owner @ March 2019, AR16 Elite, Aspire, 4th Axis & Laser
Posts: 326
|
Post by johnb on Jan 5, 2019 10:40:51 GMT -5
All links to miniwick seem to be dead...but a cordless vac on a cnc table hold down? I think not.
|
|
johnb
Full Member
   New owner @ March 2019, AR16 Elite, Aspire, 4th Axis & Laser
Posts: 326
|
Post by johnb on Jan 5, 2019 12:06:55 GMT -5
|
|
|
|
Post by buildswithbrian on Jan 7, 2019 6:39:58 GMT -5
Brian's way is not the only way. You can do it with a plenum and bleeder board like Gary suggested (with no holes). That is the route I went. Works fantastic. I used a lighthouse vac motor for the suction though. _ Looks great, can you post a pic. of how your vac motor housing and give a few mores specific on you build ? did you use the ULMDF (truepan) or ? Brian |
|
|
|
Post by parkin79 on Jan 25, 2019 11:13:38 GMT -5
Brian's way is not the only way. You can do it with a plenum and bleeder board like Gary suggested (with no holes). That is the route I went. Works fantastic. I used a lighthouse vac motor for the suction though. _ working on my version of jcwoodworking vac table. i got the plenum layout. am i missing anything from that design that i need to add?  |
|
grg
Junior Member
 
Posts: 140
|
Post by grg on Jan 25, 2019 13:04:23 GMT -5
I've got a lighthouse motor that I should probably sell now that I have a 7.5Hp Roots vacuum pump. I started designing a three motor system and and bought that one for dimensional verification - it's never been powered on and I have the face gasket that goes with it. PM me if interested. It's the Ametek 122178-18 240V single phase motor. I paid $212 for it. Willing to sell for $180. PM me if interested.
Jake Kohl
Greenville, SC
|
|
zaxis4
Junior Member
 
Posts: 162 
|
Post by zaxis4 on Jan 25, 2019 16:52:20 GMT -5
Brian's way is not the only way. You can do it with a plenum and bleeder board like Gary suggested (with no holes). That is the route I went. Works fantastic. I used a lighthouse vac motor for the suction though. _ working on my version of jcwoodworking vac table. i got the plenum layout. am i missing anything from that design that i need to add? The trick seems to be how to design the vacuum intake so that there is no leaking on the spoil. It is a lot easier with a machine that has an open table to the bottom. When you are faced with a plenum and a bleeder which is thin.....then the engineering gets messy without using thin vacuum tubing...I think anyway, that is where i am right now!!! |
|
johnb
Full Member
   New owner @ March 2019, AR16 Elite, Aspire, 4th Axis & Laser
Posts: 326
|
Post by johnb on Jan 28, 2019 20:11:08 GMT -5
working on my version of jcwoodworking vac table. i got the plenum layout. am i missing anything from that design that i need to add? The trick seems to be how to design the vacuum intake so that there is no leaking on the spoil. It is a lot easier with a machine that has an open table to the bottom. When you are faced with a plenum and a bleeder which is thin.....then the engineering gets messy without using thin vacuum tubing...I think anyway, that is where i am right now!!! If you have the shop space off the end of the table, why not build a plenum that overhangs the end of the table and construct a collar to hold the hose which would be brought up from the bottom outside of the table itself? No "thin" vacuum lines to mess with that way. The "extra" part of the plenum (beyond the cutting area) could be sealed up tight (after flycutting the entire surface of the plenum to attain a plane). You'd want to use a thin "loose" sacrificial board on top of that to hold your material in order to not create a "ledge" which would get taller with every subsequent flycut. The added length of the box would provide additional support with longer items (like when you're tiling). |
|
grg
Junior Member
 
Posts: 140
|
Post by grg on Feb 4, 2019 20:58:49 GMT -5
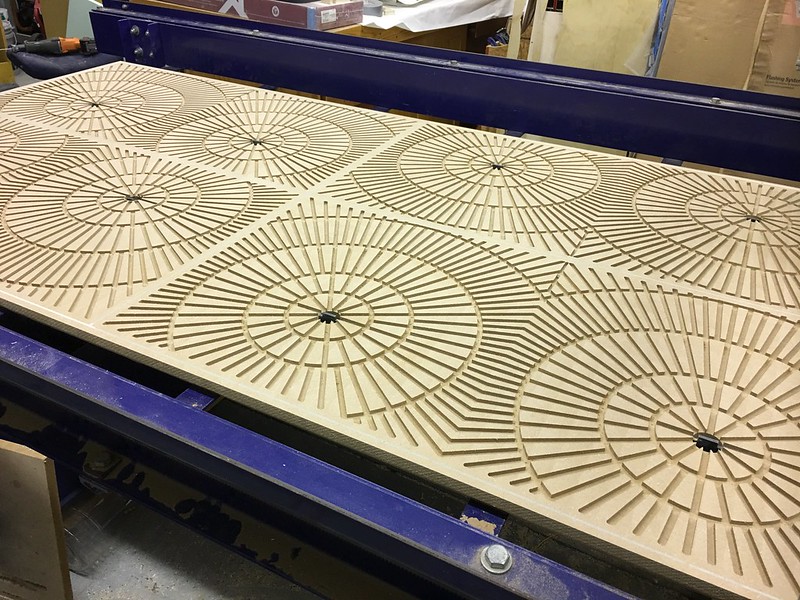
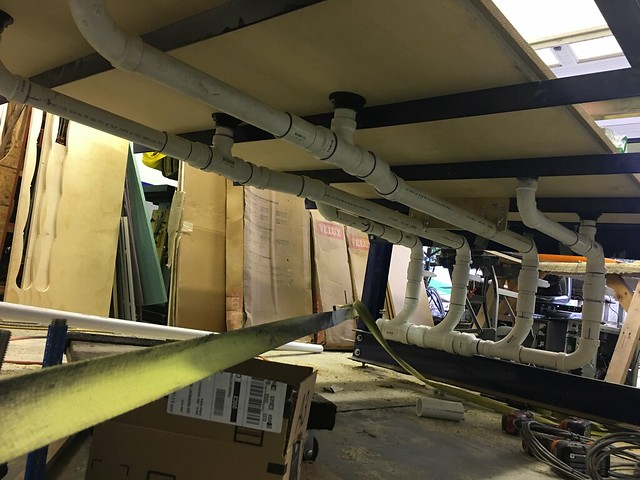
so I finally got a test of my newly designed vacuum table. Now, that said, it's not really a fair fight for this discussion. It's a 4'x8' shopbot PRT router with a 7.5Hp single phase roots blower vacuum system. I did design a new radial pattern plenum that seems to have drastically improved the performance of the original square grid system that was on this machine (mostly due to the breathing space available to the main vacuum zone ports with the radial pattern and adding two ports per zone). This pump draws 26amps under load (FLA is 32amps)...so it keeps the meter turning...I've rebuilt everything from the discharge of the pump, plumbing, to the entire sub-table. I'm able to pull more than enough vacuum force through an unaltered sheet of 3/4" MDF (still with the shiny compressed sides on both sides) to run it straight up. I'm kinda blown away with it.  Video on Facebook Video on Facebook
 |
|
|
|
Post by buildswithbrian on Feb 6, 2019 9:18:48 GMT -5
Wow, that is impressive.
just curious why you off-set the zoned radial patterns... was it easier to plumb the vacuum pipes that way?
|
|
grg
Junior Member
 
Posts: 140
|
Post by grg on Feb 7, 2019 10:53:21 GMT -5
Wow, that is impressive. just curious why you off-set the zoned radial patterns... was it easier to plumb the vacuum pipes that way? Yes, exactly. It cut down on the maneuvers in the under-table plumbing. |
|
|
|
Post by buildswithbrian on Feb 8, 2019 16:12:19 GMT -5
Wow, that is impressive. just curious why you off-set the zoned radial patterns... was it easier to plumb the vacuum pipes that way? Yes, exactly. It cut down on the maneuvers in the under-table plumbing. looks really cool too  |
|